Support - Installation & Operation
All EStock functionality can be accessed by the simple menu to the left of your screen.
Some functionality may be hidden from you depending on your user permissions. All items in the menu require only a single mouse click. Those menu items with a + or a – next to them expand to reveal further menu items.
Most EStock modules operate in the same way. Most have a common set of buttons at the bottom of the window. Double clicking on any item in the grid to the right of the window will display the desired record.
Close –Closes the window. If you have made changes to a new or existing record, you will be asked whether the change should be save or not with the option to cancel closing the window.
Cancel –When editing a record, this button will ask if you wish to save your changes. Selecting no will revert the record back to its original state. If you are editing a new record, the data will be lost.
Save – Saves the record. You will be prompted if any mandatory fields have not been filled in.
New – Creates a new record. If you are currently editing an existing record you will be asked whether you wish to save any changes, with the option to cancel the creation of a new record.
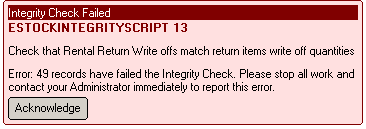
Delete –Deletes the record currently being edited. The record being delete (perhaps a customer) may be being used by other records in the system e.g. A Quote. You cannot delete a record that is being referred to by other records in the system. Some records in EStock require a reason for deletion. This supports a simple level of deleted record tracking. The person deleting the record is recorded. Deleted records cannot be reinstated.
Query – Allows you to find one or records that match known information. If you are currently editing an existing record, you will be asked whether you wish to save any changes before entering Query mode. Entering Query mode temporarily removes the ‘Query’ button and replaces it with a ‘Find’ button to be used when you have finished entering your query criteria. In most cases you may enter information into any field and then click the ‘Find’ button. You may type only partial text into text boxes in order to find any records containing the provided text. ‘ham’ has been entered in the example below which produced both ‘Hamburg’ and ‘New Hampshire ’in the results. Entering information into more than one field will further reduce the matches found.
Clear – is only enabled in Query mode, and takes the window out of query mode.
The text at the bottom left of the window denotes the current edit mode. Possible modes are Not Editing, Editing and Querying. You cannot enter any data in any fields unless you are in Edit or Query mode.
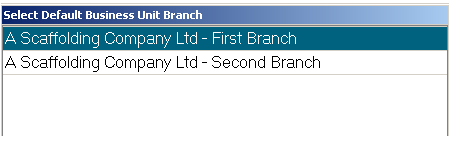
If you are managing more than one Branch in EStock, many modules allow you to switch branches on the fly using the Business Unit drop down at the bottom right of the window. If you have permissions for the given module at more than one branch, this drop down will be enabled.
Modules that have a list of items to the right of the window can be easily be sorted by right clicking on the desired column and then clicking one of the two sort options.
Drop Down Controls
The Drop Down control is used throughout EStock. It enables you to choose from a list of possible options. Typing into the field causes the items in the drop down to filter which is an easy way to locate the item of interest. You may type more than one fragment of text. The following example has found all items containing both ‘z’ and ‘la’. Some drop downs contain more than one column of values, all of which can be filtered on. To select an item, click the item with your mouse or press the ‘Enter’ key on your keyboard. To clear the value in a drop down, delete the text in the drop down and press the enter key. Note, that often a drop down will remember the last filter that was applied. If you are not seeing all available items in a drop down list, press the ‘Backspace’ key on your keyboard to clear all the text from the drop down. This will cause the drop down to show all items in the list.
When enabled, the ? button will open the associated window for the items in the drop down. In the example below, the ? button will open up the Country maintenance window.
Drop Down Synchronisation
When you edit or add new records to the support tables such as Customers or Cities within EStock, any associated drop downs will automatically update with the changes that you make. In the example below, after jumping to the City maintenance window using the ? button on the City drop down, a new City was created and saved. When returning to the City drop down, the new city is located at the top of the list in the drop down.
Grids
Grids in EStock operate in two modes, editable and non editable. Editable cells are coloured white. Some grids allow you to delete entire rows by clicking the square button at the left of the grid line and pressing the ‘Delete’ key on your keyboard. To edit a cell, simply click on the cell with your left mouse button. To forward navigate between cells, press the ‘Enter’ key on your keyboard (not the ‘tab’ key). To delete a value in a cell, select the text in the cell and press the ‘Delete’ key on your keyboard. Some grids also allow you to copy and paste information ‘to’ and ‘from’ the clipboard. If available, you can access the menu by right clicking your mouse on the grid.
Windows sizes
Most windows within EStock are sizeable. If you change the size of window, EStock will remember the size that you set them at, and will open with the same size the next time you use them. We recommend running EStock using a screen size greater than 1024 x 768 pixels to make the best use of EStock’s features.
You may also change the size of the grids that are present to the right of most windows within EStock. Place your mouse just to the left of the grid until the mouse changes to the East-to-West symbol. Press the left mouse button and drag the size of the grid to make it wider or thinner to suit. EStock will remember the width of the grid for the next time you use that window and will store your window settings in the system so that if you login to EStock from another computer, your window settings will follow you.