Support - Resource management
Each Job Event type can have a color that will help you group the events visually in the Job Planner (see below).
The sort order is a number that you can set to determine the order in which the event types are displayed in the job planner. The higher the number, the farther down the list the event will appear.

Job Planner
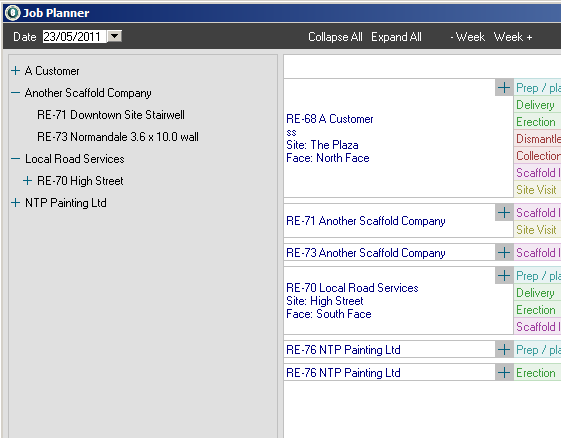
At the left hand side of the Job Planner, you are presented with a list of all live Rental Jobs. They are listed in order by customer name and expand down to reveal each live job that the customer has open, together with each face that is present on the job. It is thus possible to allocate resources to individual faces on each job.
To add a job face to the planner, simply locate the desired job face in the left hand tree and click it once. The face, together with its associated job information will appear in the right hand event window. If required, you can click on the job information text and jump the associated Rental Job.
By defaut, the event will expanded, showing all the possible Job Event Types. To add an event for a particular day and event type, simply click once on the appropriate colored square.
EStock will fill in the event square and launch the Resource Allocation window where you will be able to add one or more resources for that day and job event combination. A colored square with a thick gray line on it means that no resources have been allocated as yet. This is useful if you simply wish to 'pencil' into the Job Planner, that you will expect to be working on a site in the future but do not know who the resources will be. Don't forget that resources may also include trucks and other machinery that you have at your disposal.
To delete an event, hold the control key (CTRL) down while clicking once on the colored square. You cannot delete an event that has one or more allocations against it. If you with to delete such an event, you will have to click on the square which will show the Resource Allocations for the event, and proceed to remove any allocated resources before removing the event.
Jobs that are no longer live will be displayed as gray boxes. You cannot delete or modify events associated with dead jobs.
Resource Allocations
This window is accessible by clicking on one of the sqaures in the Job Planner.
To add a resource, simply click on the resource name in the list on the left hand side. EStock will automatically fill in the hours for the day on this event using the information stored against the Resource. If the resource has already been allocated on another job event, the allocation bar will be gray.
You can delete or manually edit the allocation times for a resource by clicking once on the colored allocation bar.
You may also modify the allocation using your mouse, by holding down the control key (CTRL) and clicking once on the appropriate allocation cell.
Clicking on the 15, 30 and 60 min interval buttons, alters the time steps display.
Sometimes you may have jobs and events that utilise the same resources day after day. Click the Clone From Most Recent Day button to copy the resources from yesterday for the same job event. EStock will not let you perform this operation if there are any resources already allocated.

Resource View
No allocations can be edited here, but you can click on any of the allocations and go to the Resource Allocation window to edit them.
You may print out your staff and resource allocations either grouped by Job or listed by resource, and give the print outs to your staff for the day.

Resources
Color - Set the color out each resource to help group them visually in EStock
Hourly Rate - Used by the Job Hours report.
Charge Out Rate - This will be used in later versions of EStock when exporting data to Payroll and to possibly generate charges on Rental Jobs
Default Start and End Time - When you add a Resource to a Job Event, EStock will use these times to determine the normal working day for each resource.
Default Meal Start and End Time - When you add a Resource to a Job Event, EStock will use these times to determine the Meal Time for the Resource.
Active - Once a Resource has been used in the system, it cannot be deleted because it will be attached to one or more Job Events. If you staff member is no longer with you, un-check the active box so the name cannot be chosen on further Job Events.

Time Codes
These are used by the system when displaying Resource Allocations and the Resource View.
