Support - Rentals
Damaged or lost equipment
From time to time, some equipment will be lost, damaged or stolen. To record this event in EStock, you should first enter all the equipment on a Rental as returned.
There are two ways to record such an event. If you have been transferring all your sales stock from your purchases to rentals, you should manually transfer back from the rental location any stock that has been lost, and then manually create a transfer from sales to the system defined ‘Write Off’ location. This will allow you to track the cost of damaged or lost equipment. If you have been running EStock without transferring your Rental stock from sales to Rental (i.e running EStock with negative rental stock balances), you can record the event by entering the lost or damaged components via the Non Sales Stock Adjustment module.
Non sales stock quantities can be increased or decreased using this tool. To decrease your stock quantities, enter a negative number. You may wish to use this tool if you receive extra equipment on a return and wish to record it to correct you stock levels.
If you perform regular stock takes on your Rental stock you can use this tool to correct stock levels. If you have been transferring your Rental stock from your Purchases and find that your stock count in your yard is lower than that in EStock you may wish to write off the missing stock to track the cost.

Dispatches
There is only one way to create a dispatch for a job and that is via the Dispatch button in the Rental Job module.
Clicking this button will create a Dispatch for any components not yet dispatched that do not have the ‘Hold’ flag set.
The Dispatch is pre-populated with component quantities and has a status of Pending. You cannot increase the quantities only decrease them.
The quantity of Rental Stock available is shown together with the quantity that is unavailable according to EStock’s Rental stock count. EStock will not stop you from creating a Dispatch even though it may compute that there is insufficient stock available.
A Dispatch can have one of four statuses. Three are symbolic; Pending, Allocated and On Back Order. The fourth status is Completed. By saving a dispatch with a Status of Completed, you instruct EStock to draw stock from the Rental stock pool. Once completed, a Dispatch cannot be edited, only deleted. You cannot delete a Dispatch that has been invoiced or has one or more of its items returned.
From this module you can print address labels that you can attach to the equipment being dispatched and display a dispatch and return history for this Rental.You can also access and edit existing Dispatches via the Stock Rental menu.

Exporting invoices
You can export your Invoice information from EStock so you can import it into an external accounting package. You can access the Export tool via the Stock Rental – Tools and Options menu.
Select the format that you wish the data to be presented in and click the Export button. All Invoices and Credit Notes that have not been exported will be exported. EStock records each export batch that you create so you re-export the Invoices in the future if required. To export a previous batch, simply click the batch line and then click the Export button.
Data is exported in a tab delimited text file format that most accounting packages can read. More formats may be added in the future to suit the every growing accounting package market. If you select a format that will include account codes, you will need to configure EStock with your account code information.

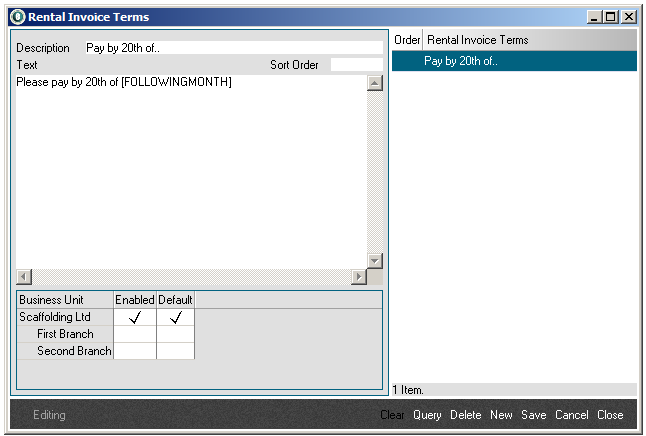
Invoice and Rental terms
By creating a number of different terms that can be selected on a Quote or Job, you can provide the user with a broad set of terms that will appear on printed Quotes and Invoices. You can select which Business Units the terms will available at and whether the terms will be selected by default for new Quotes or Jobs.
When editing your terms, you may need to consider how the text will look on your Quote or Invoices and whether the text will line-wrap in the places that you prefer. This is largely done by trial and error, though making the window larger when editing can help.
Both Rental and Invoice terms support embeded fields that will be replaced by EStock when printed.For Invoice terms, the only field currently available is [FOLLOWINGMONTH], where EStock will add one calendar month to the Invoice date.
For Rental terms, the only field currently available is [AUTHOR], where EStock will replace the field with the name of the Author Quote.
Invoice payments
EStock does however provide a simple tool to track which customer invoices have been paid.
Simply tick the paid column and enter the appropriate payment date against each invoice.

Invoice run tool
You can access the Invoice Run tool from the Stock Rental – Tools and Options menu.
The Invoice Run tool will automatically generate Invoices for any live Rental Jobs at your Branch.
After entering the Invoice and Cut-Off dates you can elect to see a preview of all the Invoices that EStock will create by clicking the Preview button. Remote Access Technologies strongly recommends that you carefully go through the preview before generating any Invoices. Once Invoices have been generated they have to be deleted one by one if there is a mistake. EStock will not generate Invoices for a duplicate or overlapping period on a rental nor will it generate Invoices for Rentals who’s Invoice Type is set to Manual Invoicing.
Once invoices have been generated, you can batch print them by clicking the Print button. Additionally you can re-print previous invoice runs if necessary by selecting a previous run and clicking the Print button.
Invoices and credit notes
Invoices and Credit notes can be created in one of three ways. System generated, Manual and by using the Invoice Run tool.
In EStock, a Credit Note is simply an Invoice whose total is negative when created, which causes EStock to mark the Invoice as being a Credit Note.
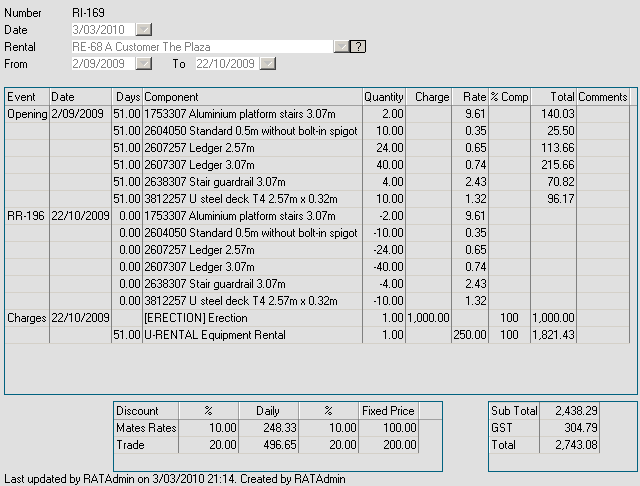
EStock keeps track of which items on each Rental Job have been invoiced or not as well as all Dispatches and Returns. Using this information together with the dates on the last system generated Invoice for the given Rental, EStock can compute what items need to be invoiced. To have EStock create an Invoice for you, click the Invoice button on the Rental Job.
You will be presented with a dialog window containing two dates. The Invoice date is the date on which the Invoice is to be generated for. The Cut-Off date tells EStock to exclude any Dispatches or Returns after the Cut-Off date. Neither date can be in the future.
The From and To dates are computed by EStock. If there are no previous system generated Invoices for the Job, the From date will be the date on the first Dispatch. If there are no Dispatches on or before the Cut-Off date, the From date will be date of the Invoice. The To date will be the date of the Invoice unless all equipment has been returned prior to that date, in which case the To date will be that of the last Return date.
The items on an Invoice are ordered by date. If there have been previous Invoices and equipment was still out as at the From date on the Invoice, there will an Opening event listing all equipment that was out as at the end of the last system generated Invoice. The Days column is computed by counting the number of days from the Event to the To date on the Invoice. The Opening balance event or a Dispatch event will be recorded as Invoiced for the whole of the Invoice period. Returns then deduct from the Invoice to arrive at the correct Invoice figure. If the Return RR-196 above had the ‘Charge for day of return’ check box ticked, the number of days computed against the Return in this example would be 0 (the number of days since the Return minus 1) so as not to deduct the day of return from the Invoice.
EStock Invoices have been created this way because it is easy for a Customer to see the hire events on chronological order. Charges appear at the end of the Invoice. Any non physical rateable charges such as the general ‘Equipment Rental’ item above are charged for the entire period of the Invoice. Any Discounts defined on the Rental are carried through to the Invoice.
Invoices can be created manually by clicking the ‘New’ button in the Rental Invoices and Credit Notes module.
You can enter any Component on a manual Invoice but you may only enter amounts and not rateable charges spanning a period of time. Because of this you cannot enter any From and To dates on the Invoice. To credit a customer enter a negative amount in the charge column, though the total on the Invoice when saved must be negative for EStock to change the Invoice to a Credit Note.

Job combiner
Simply follow the instructions displayed in the tool to combine two jobs.

Jobs and Quotes
For the ease of documentation, the functionality of a Rental Job will be used here, but the same applies to Quotes.
Order Number The Customers Order number.
Job Type There are currently two types of jobs, Rental and Contract. The only real difference between the two is the way in which the Quote and Invoice printouts are layed out. A Rental Job type is essentially one where there will be a lot of gear listed and charged for, where as a Contract Job type is likely to have only a small list of hire and delivery charges printed. You can have any mixture of charges and gear on either job type and the job type can be changed at any point. Change the Job Type on a Quote and compare the change in print out.
Author Will default to the logged in user who creates the Job but can be changed if required.
Contact Any number of contacts can be recorded against a Customer. If any have been created against the chosen Customer, you can optionally choose a Contact here.
Description The description of the Job. A Job can have many faces/zones and each can have its own description. The Job description here is a short general description covering all the work. An example might be 'Stadium Refit' or 'New High Street shopping complex'
On the left hand side is a small menu that allows you to navigate around the different areas of the Job.
Details are the general details that apply to the entire job.
Start and End Dates determine the life-span of the Job. You are not required to enter an End Date. A blank End Date or an End Date in the future goes into the calculation that determines whether a job is live or not.
Start and End Charging Dates are used by the Invoicing process to determine when to start and stop charging. A blank End Charging Date or an End Charging Date in the future goes into the calculation that determines whether a job is live or not.
Minimum Weekly Charge allows you to set the minimum amount you wish to charge the customer no matter what charges or equipment are present on the Invoice.
Minimum Rental Charge applies to the last Invoice generated for the Job. The difference between this value and the total value of gear rented will be added to the final Invoice if the difference is positive.
Invoice Type There are at present, only two types of Invoicing that EStock handles. More may be added if required such as invoicing in advance. Manual Invoicing means that the Invoice Run Tool will skip this job when generating Invoices and you will have to create the Invoice manually via the Invoice button at the bottom of the window. Arrears/Arrears means that the invoicing process will invoice based on all charges and activity that can be invoiced for, up until a given date. Arrears/Arrears means an invoice cannot be dated in the future or generate an Invoice in advance.
Invoice Period is used by the Invoice Run Tool and not when invoicing manually. A value in this field means that the Invoice process will not issue an invoice if the customer has received an Invoice for this job within the number of days specified.
Rate Multiplier modifies the rates of all non charge components entered on the job that have not been Invoiced and that do not have a charge value entered against them. This should be set when the Job is first created because changing the value once components have been entered on the Job causes EStock to look up the Component rate in the system and then multiply it. If you have entered a custom rate against the component or there is no rate information set up against the component then those fields on the Job will change or become blank. This field essentially provides a way to globally increase or decrease the rates on a Job without the factor appearing on any of the customer print outs. You may for example enter a figure greater than 1 for a customer or site that often gives you trouble and you want to increase your rates a little.
Signed Quote Received is safety check box that prevents a Quote from being turned into a Job without having received authority from the Customer. On a Job, this field is currently for recording purposes only.
Delivery and Address Information record the site address and site contact information. This information appears on the Quote, Job and Invoice customer print outs.
Terms and Conditions Both these list of options can be custom defined by you. See Invoice and Rental terms. Any ticked items will appear on the Quote or Invoices for the Job. Examples are 'Please pay by the 20th' or 'This quote is valid for 30 days' etc.
Notes is a general space where you can write information about the job. Text entered here will appear on the Quote print out given to the Customer.
Discounts default to the rates set against the Customers record but you can edit them on the Job as required. The grid shows all the active discount types, their rates and the value that the discount has deducted from any items that are elligable to appear on the next Invoice.
Weekly Rate and Fixed price grids show the totals for the two types of items for any items that are elligable to appear on the next Invoice. The weekly rate grid shows a total for components with a rate entered against them and is calculated for a period of one week.
Images allows you to store in the system, one or more images related to the Quote or Job. Clicking Select allows you to browse your local computer to find the image to import. At a later date, you may export the image out of EStock for other purposes but note that EStock resizes all imported images to approximately 640x480 pixels in order to prevent EStock becoming overloaded with large images taken on hi-resolution cameras.
A Job can support one or more faces. The term 'Face' is used loosely and refers to any separate area on a site whether it be the particular side or area of a building or perhaps a section of a bridge or structure. Supporting multiple faces means EStock can support a large Job that may change and alter over months or even years.
All faces appear under the heading of Contract. By default, a new Quote or Job comprises of a single Face. You can add a new face at any time by clicking the New Face item in the list to the left. As you will see below, each individual Face can be marked as In-Active and/or marked as a Variation. Any faces marked as such will be grouped together.
A Face might be marked as a variation when it differs from the original, perhaps defined on the original Quote.
You may mark a Face as In-Active if you know that all gear on the Face has been returned and there are no pending charges to be Invoiced. This mechanism is useful on large jobs where over time, parts of the Job have been completed and you want them 'out of the way' in the list. Marking a Face as In-Active does not affect the invoicing process. Any items still to be invoiced on an In-Active face will still be processed.
Each Face has the same functionality. Against each Face you should enter a description to distinguish each Face in list to the left.
On some Quotes or Jobs, you may wish to track dispatched gear but may zero rate each component in order to simply present the customer with a single charge or hire fee per week. In such a case, you may wish to hide the equipment list on the Quote. Each Face allows you to do this by ticking the 'Don't print zero rated physical items'. As mentioned above, you may also categorise a Face as In-Active, a Variation, or both.
Each row in the grid allows you to enter a Component item, whether it by a physical item such as a scaffold tower or digger, or a non physical item (charge). Upon entering a component, EStock will display how many you have in rental stock if it is physical item. Additionally, EStock will populate the Rate column using the data entered against the Component record.
You are required to enter a quantity greater than zero against each item. You may enter a single Charge amount against any component or a weekly Rate. A charge will be invoiced only once (when the % Complete column is 100), were as an item with a rate entered will appear on each invoice up until the final invoice or as the From and To date columns specify.
The % Complete column allows you to modify the percentage value of an item. An example of its use might be that you have been charging a single hire item such as [Scaffold Hire] but have removed the top portion and only wish to charge 50%. You cannot alter the % Complete value if the item has a charge against it and has been invoiced and the most recent invoice invoiced at 100% complete for the item. An item with a rate against it can we changed at any time.
The % Invoiced column shows you the % Complete value of the item on the most recent invoice if applicable.
The Total is either Quantity x Charge x % Complete or, Quantity x Rate x % Complete.
P-Disp shows you any quantity that is present on 1 or more pending Dispatches.
Disp shows you the quantity that is present on 1 or more completed Dispatches.
Ret shows you the quantity that is present on 1 or more completed Returns.
Out is the difference between Dispatched and Returned.
The Inv column show you whether the item has been Invoiced, whether once or many times if it is a rateable item.
The From and To columns are only enabled on items that have a rate entered and that are non physical items such as general rental or hire charges. This allows you to only charge for a hire item between set dates. You do not need to necessarily have to provide both dates. Only entering the From date means the item item will be charged continuously after the From date. Only entering the To date will mean the item will be charged up until that date.
The Comments column allows you to add text that will appear against item on the Quote or Invoice. This might be comments about the rate being charged or perhaps what the gear was for.
Grid Operation
If you right click on an editable and selected row in the Component grid, you will be presented with the following menu.
Copy Components copies to the Windows clipboard, all the Components on the face. This is useful if you want to copy gear top another Job or Quote.
If the Windows Paste contains Components pasted to it from EStock, selecting Paste Components will add those components to the Face.
Select a row using the row selector at the left of the grid and the following menu items will become enabled.
Insert Row will insert a blank row at the current position.
Delete Row will remove the row if it has not been Dispatched or Invoiced.
Move Up and Down will allow you to manually order Components on the Face. You may also move rows by holding down the CTRL key on your keyboard and pressing either the + or - key at the same time.
Face Buttons
The Dispatch Face and Return Face buttons are only available on Jobs and not on Quotes. They allow you to launch the Dispatch or Return window for gear related to the current face only. To Dispatch or Return all gear for all Faces on the job, use the buttons at the bottom of the Job window.
Delete Face will remove the Face and all items listed on it but only if none have been Dispatched or Invoiced etc. This button will be disabled if you are viewing a Quote that has been turned into Job.
The Sort By Code button will order all items on the Face using the Code on each Component. This is useful for Faces that contain large gear lists.
Quote Buttons
There are only two buttons unique to the Quote window.
Rent will turn the Quote into a live Job, but only if the Quote has not been turned into a Job already. If you want to reuse a Quote more than once in this way, you should Clone the Quote and turn the new Quote into a new live Job.
Clone - clones the Quote.
Job Buttons
The Invoices, Dispatches and Ruturns buttons pop the respective modules in EStock, showing only records associated with this Job.
Balance Sheet shows a report listing the total number of Dispatches and Returns for all components on the Job.
Return Sheet shows a report only listing quantities for Components still out on this Job.
History pops the Delivery Return History window that will show you all Dispatches and Returns, together with thier related Invoices.
Return all with create a pending Return for all gear still Out on the entire Job.
Dispatch all with create a pending Dispatch for all gear that remains to be Dispatched on the entire Job.
Invoice will let you manually generate an Invoice for the entire Job.
Clone - clones the Job.

Returns
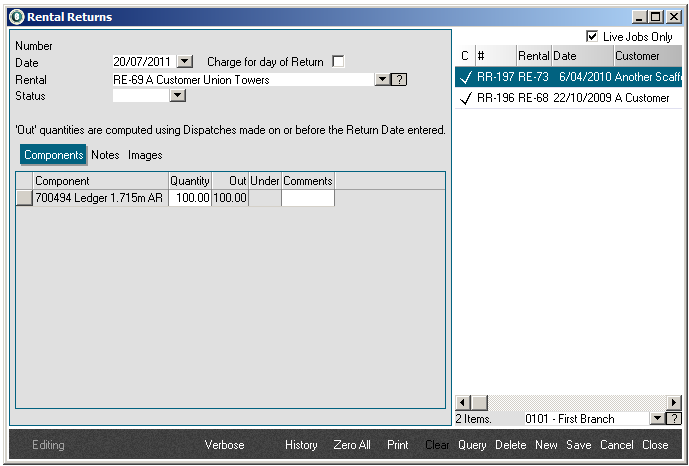
You can create a new Return in one of two ways. The first is by clicking the Return button on the Rental Jobs module.
Clicking this button will automatically create a Return pre-populated with any equipment that is currently out. The second is by clicking Returns on the Stock Rental menu. Creating a Return this way will require you to select the Date and the Rental that you wish to return equipment for. The component grid will be populated with any equipment that is currently out.
You must select a Date and a Rental in order to return any equipment. EStock will use the date entered to exclude quantities from dispatches create after the date entered (you cannot create a return for equipment before it has been dispatched). You also cannot create a Return with a date earlier than the most recent system generated Invoice for Rental entered.
A Return can have one of four statuses. Three are symbolic; Pending, Allocated and On Hold. The fourth status is Completed. By saving a Return with a Status of Completed, you instruct EStock to return stock to the Rental stock pool. Once completed, a Return cannot be edited, only deleted. You cannot delete a Return that has been invoiced.
EStock keeps track of the date when each component is dispatched and returned. Using this information, EStock can then compute the number of days a component has been rented. By default EStock will not charge for the day on which equipment is returned because often, equipment is returned the day after the hire. This includes equipment dispatched and returned on the same day so equipment hired and returned on the same day should have the ‘Charge for day of Return’ ticked if you wish to charge for it.
The component grid shows the quantity still ‘Out’ on the Rental and the computed quantity ‘Under’ which is the quantity Out minus the quantity entered to return. You cannot return more equipment than has been dispatched and not return as at the date on the Return.
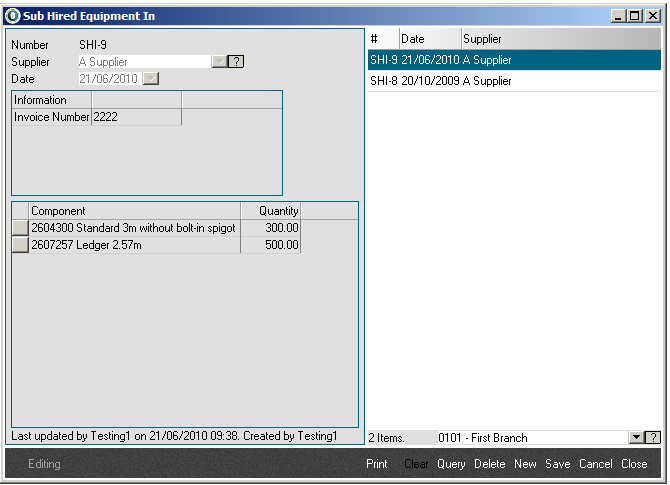
Sub hired equipment in
From time to time you may wish to temporarily source rental equipment from a supplier or other scaffold company when your rental stock levels are running low.
You can do this using the Sub Hired Equipment In module located in the Stock Management menu. Stock brought in using this module will increase your rental stock on hand quantities within EStock.
Select a known supplier from the list. If the supplier is not in the Supplier drop down but you know there are in your EStock system you may need to make the company a supplier via the supplier tab in the Customer and Supplier module.
The date is the date that the equipment was sourced. In the example shown, the suppliers invoice number has been recorded. Enter the components and quantities for the equipment you have sourced.
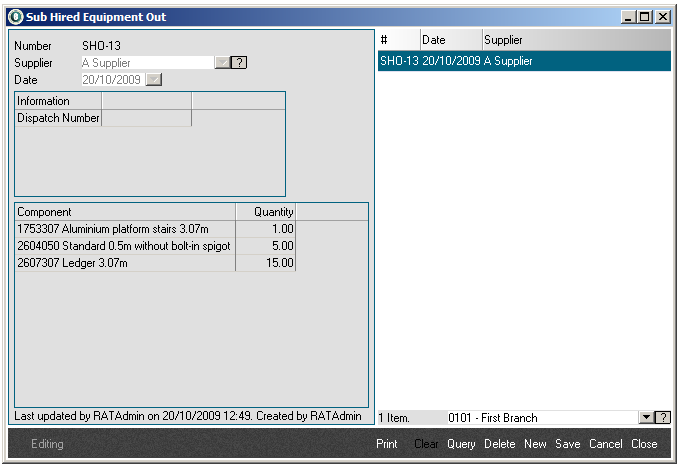
Sub hired equipment out
Use this module to return Sub Hired equipment that you have sourced from an external Supplier. You can access this module via the Stock Management menu.
When you select a Supplier the component grid will populate with any components that have not been returned to that Supplier. Any equipment acquired after the date entered is not included. Stock returned in using this module will decrease your rental stock on hand quantities within EStock.
Transferring from sales stock
EStock is able to monitor your Rental stock levels, enabling you to easily check from within the system, the quantity you have on hand for any given component
To do so, you will need to import all your purchased or sub-hired equipment into EStock and then transfer the purchases within the system to Rental stock. This will provide EStock with stock levels from which to deduct dispatched items. EStock does not require you to have any stock transferred in order to rent and dispatch equipment. Any items dispatched will simply cause the Rental stock levels to go negative. You can still run reports to see the stock you have out whether it be at Project level, or Business Unit level.
You can transfer sales stock via the ‘Stock Management’ item in the tree menu, or launch it via from the Purchases module by clicking the Transfer button.
Launching if from the Purchases module will pre-populate the grid with components and quantities that are available on the Purchase.
The date determines which Purchases are eligible for drawing stock from. Transferring from Sales stock requires a Purchase to have been received, and its ETA date to be on or before the date of the Transfer. The ‘In Stock’ column in the grid is computed by summing the ‘Available’ column on all eligible Purchases.
The Stock Location will be ‘Rental Stock’, which is a system defined location used by EStock. You can decide to move your oldest or newest stock using the Allocation Order drop down. When launched from Purchases, the Allocation Order should have no effect since the Transfer will be looking solely at drawing stock from the Purchase that it was launched from. You cannot enter components that have been superseded.
When the transfer is launched from the main menu, stock will be drawn from any available Purchases that have been received on or before the Transfer date. Clicking the ‘Zero All’ button will zero the component quantities on all rows allowing you to easily specify quantities for just a few components on the purchase.

Transferring to sales stock
You can transfer stock back to sales via the ‘Stock Management’ menu.
You may only transfer stock that has been transferred from sales back to sales, on or before the date of the original transfer. The ‘In Stock’ is calculated by summing all the stock that has been transferred to the given location and has not yet been transferred back.
The Allocation Order determines which stock will be transferred back to sales first. Oldest is determined using the date on the Purchase from which the stock was originally transferred, not the date that it was transferred. You cannot enter components that have been superseded. The In Stock column is the quantity currently held that the location.
